 Do you have a dehydrator (if you don’t-see note* below but, you should totally get one!)? Do you have apples? Well, what are you waiting for? Let’s dry some apples! If you look at a lot of info on dehydrating fruits, it’ll tell you that you have to add sulfites. In fact almost all dried fruit has added sugar, oils, and sulfites. Well, not in the Garden Fresh Foodie household! What’s so bad about sugar, oils, and sulfites? Well, #1 you don’t need the added sugar. Your fruit should hold all of the goodness you need. #2 oils add nothing other than fat calories to your food, without added nutrients. #3 Sulfites are completely unnecessary. They are used to prevent browning of your fruit and are used also in the wine industry. Unless you believe in perfectly colored foods (which I don’t really know what that means), I think a slight darkening of my fruit is a-ok. The fruit you dry will have so much more flavor, plus, you’ll be supporting your local faming community (provided you can get fresh local apples). Sulfites have been linked to many problems such as; headaches, itchy skin, respiratory problems (more common in asthmatics), and even sever anaphylactic shock. (want to read more?). Some people can’t even have sulfites as they are allergic to them. So what’s the point in having dry fruit when you can’t even take it. You might as well just have normal fruit and not have to suffer with your sulfite allergy.
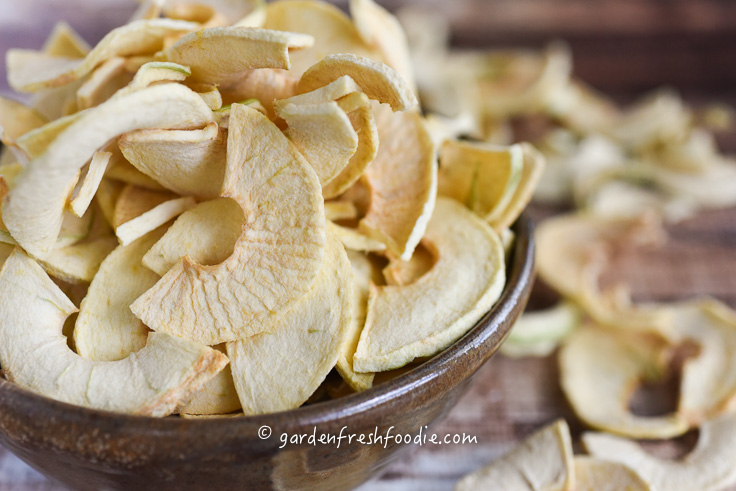
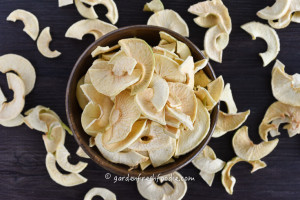
Since we just picked 179 pounds of apples, we’re making apple everything. I give my dried apples, along with other jams, away as holiday presents. People devour them as soon as they get them! They’re great to add to granola, salads, or as a fast snack. My kids love to take them on the go and they’re great for hiking and camping. Yumma! 
To make life so much easier when peeling a ton of apples-I find it’s really helpful to have an apple peeler, like this one. There is a trick to making sure it can handle your apples. Make sure you have the stem centered inside the round circle. This ensures the core will go through straight and it won’t conk out on you when you’re trying to get those large apples peeled. 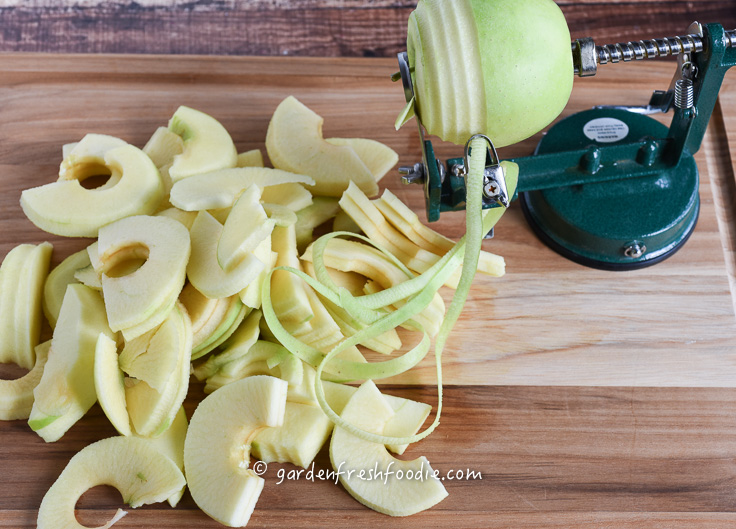
The tools: I use an excalibur 9-tray dehydrator. I LOVE it! I started off with a less expensive dehydrator that had its fan on the bottom. Things didn’t dry evenly, and it didn’t have a timer or a way to easily control the temperature. Once I decided to go for it and upgrade, I have never been dissatisfied! I use it for dehydrating tomatoes, kale chips, apples, and making crackers. *If you don’t have a dehydrator you can use your oven if it can go down to 118. Above 118 degrees, enzymes are denatured and the food is no longer considered raw. My oven can only go down to 140 degrees. At 140 degrees, you begin to lose the benefits of dehydrating, since enzymatic levels drop off once you go above 118. You really don’t want to dry at a temp higher than that, as you apples will dry out too quickly and the sweetness won’t be retained, but if an oven is what you have, use it. It’s still better than commercially dried apples, that have the added sulfites, sugars, and oils. Create a screen that you can put your fruit or veggies on with a drip pan beneath, such as a cleaned window screen covered with cheesecloth. Treat this system the same as you would the dehydrator. Check a lot sooner though, as your oven creates a larger surface area, and things will dry out a lot faster (probably by 2-3 hours vs. 6-8). I’ve never dehydrated in an oven, but I know you can.
So how do you dry your apples?! Easy peasey!
Ingredients:
- As many apples as you feel like drying (or for me, as many as I can fit on my 9-tray Excalibur dehydrator-love it! Usually about 12 pounds at a time)
- 1 cup of orange juice*
- 3 cups water*
*If doing a lot of apples, I double the liquid. I also usually do this on the same day I’m making apple sauce. The extra water/juice mixture is then used in my apple sauce as my liquid.
Instructions:
- Place water and oj in a large bowl.
- Peel, core and slice apples. We use an apple peeler. You should get one if you make anything with apples, your life will be so much easier! (apple pie, cobbler, apple pancake, garden fresh foodie apple sauce, cinnamon apples for breakfast-you get the picture)
- Dunk apples into water/juice mixture for about 2 minutes, or until you’re done peeling and cutting (keeping them in the juice helps prevent browning)
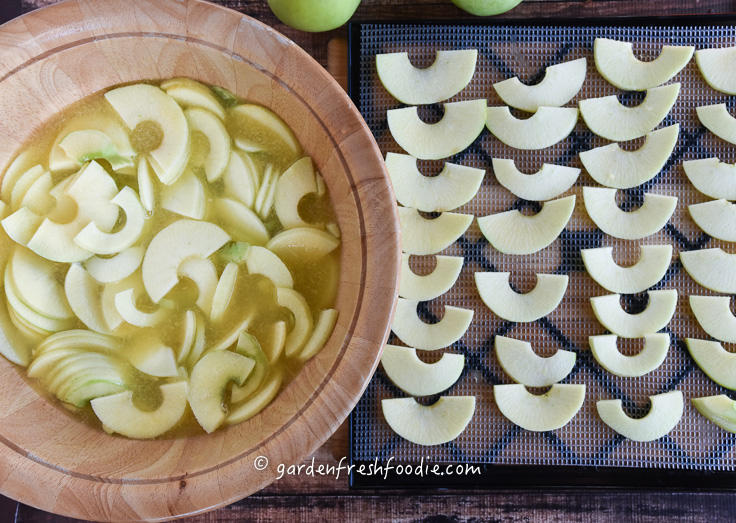
- Remove and place onto dry sheets.
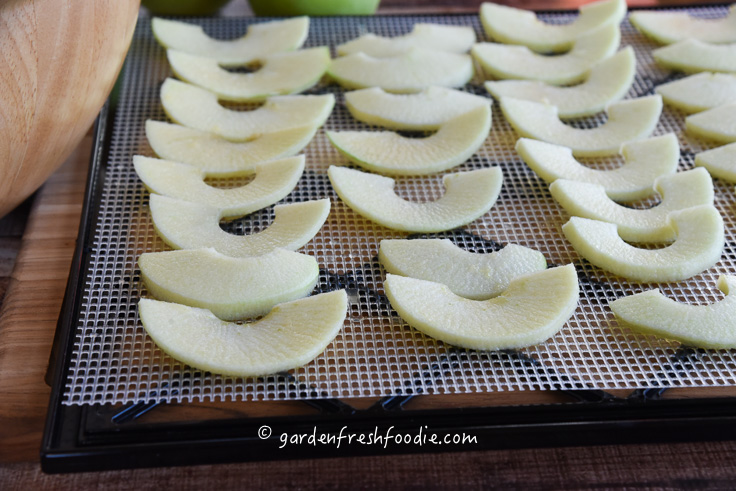
- Dry at 118 degrees for about 6-8 hours. Check apples at 5 hours. Some will dry faster than others. Remove the ones that are done, and rotate trays. Dry until texture is no longer sticky, and apples are dry but not crunchy. They should bend. If using an oven, put your temperature down as low as the oven can go, preferably no higher than 140 degrees. Check after 2 hours (see note above*)
- If you are looking for a chip texture, dry for longer. We stop at the just no longer sticky stage. See our youtube video on how to dry apples.
- Place into a large container and let sit for about 2 weeks, shaking every other day or so. This allows the apples to redistribute any remaining moisture. Vacuum seal for long term storage.
- If you want them in recipes, you can pour hot water over them and let them rehydrate for 5 minutes. This will make them more plump (this is a great thing for all dried fruits and veggies).
Nutritional Benefits:
- No added sugars, oils, or preservatives
- Uses local, in season fruits-height of nutritional value
- Foods dehydrated at temperatures at or below 118 still retain their raw nutritional benefits
- Good Source of Fiber-great for digestive health, preventing cancers, and regulating blood sugar
- Diabetics: it’s easy to eat a lot of dried fruit vs fresh, since the water content is gone and you don’t feel as full from it. Be careful as to how much you are consuming, sugars are more concentrated in dried fruits. However, if you desire dried fruit, it’s best to make your own so you can control what’s in or not in your food.
- As many apples as you feel like drying (or for me, as many as I can fit on my 9-tray Excalibur dehydrator-love it! Usually about 12 pounds at a time)
- 1 cup of orange juice*
- 3 cups water*
- *If doing a lot of apples, I double the liquid. I also usually do this on the same day I'm making apple sauce. The extra water/juice mixture is then used in my apple sauce as my liquid.
- Place water and oj in a large bowl.
- Peel, core and slice apples. We use an apple peeler. You should get one if you make anything with apples, your life will be so much easier! (apple pie, cobbler, apple pancake, garden fresh foodie apple sauce, cinnamon apples for breakfast-you get the picture)
- Dunk apples into water/juice mixture for about 2 minutes, or until you're done peeling and cutting (keeping them in the juice helps prevent browning)
- Remove and place onto dry sheets.
- Dry at 118 degrees for about 6-8 hours. Check apples at 5 hours. Some will dry faster than others. Remove the ones that are done, and rotate trays. Dry until texture is no longer sticky, and apples are dry but not crunchy. They should bend. If using an oven, put your temperature down as low as the oven can go, preferably no higher than 140 degrees. Check after 2 hours (see note above*)
- If you are looking for a chip texture, dry for longer. We stop at the just no longer sticky stage. See our youtube video on how to dry apples.
- Place into a large container and let sit for about 2 weeks, shaking every other day or so. This allows the apples to redistribute any remaining moisture. Vacuum seal for long term storage.
- If you want them in recipes, you can pour hot water over them and let them rehydrate for 5 minutes. This will make them more plump (this is a great thing for all dried fruits and veggies).


Other than using for some recipes, is there a reason you are peeling them first? Aren’t you missing out on a lot of nutrients on the peels? do you do anything separate with the peelings?
Hi Brenda-I peel them, because when I dehydrate them, the skins get tough. Yes, the skins have nutrients in them, and it’s fine to leave them on, but it’s a textural thing for us. For cobblers, and general sautéing , I leave the skins on most of the time. I compost what’s left over. Hope this helps!
Can you use Lemon Juice instead of Orange juice? I have a ton of lemons.
Sure! Just dilute it